At work, we deploy all applications as Docker containers via Kubernetes – I really like this way of delivering applications, running on one machine means it will work the same way (in theory) as in another machine. Why not do the same for my Hobby projects albeit a much more simplified way.
So, this weekend, I made my first attempt – what I wanted to achieve is a proof of concept, .NET Core app talking to MySQL, both of which being docker-ised. I also wanted to use Gitlab’s free CI for it’s simplicity as this is what I’m really after – don’t want to have to write a ton of scripts.
Setting Up MySQL
Of course, being the main dependency for the app, I wanted to have MySQL up and running first.
I first spun up a Digital Ocean Droplet (1GB RAM) with ssh key setup for scripting purposes later.
Once I had ssh‘d into the box, first thing’s first – update the package list.
apt-get update
Since, I want everything dockerised, we want to install docker:
apt-get install docker.io
Then, I want to create a shell script to run a MySQL container, so I create a shell script.
cd /home
mkdir mysql
touch mysql.sh
nano mysql.sh
This is the shell script itself, let’s fill it in.
docker run -d --restart unless-stopped \
  -e MYSQL_ROOT_PASSWORD="YOUR_MY_SQL_ROOT_PASSWORD" \
  -v /home/docker/mysql-data:/var/lib/mysql \
  -p 3306:3306 \
  mysql
This docker run shell script will keep our MySQL container running unless stopped, which means it should always be available for all the dependee’s.
Exit the editor, and run our lovely script.
sh mysql.sh
Make sure that our shell script actually did something, check current containers running.
docker ps -a
We should see that our MySQL container is running fine and dandy.
Let’s login to MySQL, create a schema and restart MySQL to make sure everything is persisting fine. For this, we need a MySQL client, so let’s go ahead and install that.
apt-get install mysql-client
Connect to our MySQL server.
mysql -h 0.0.0.0 -u root -p
We should also see that /home/docker/mysql-data is persisting our MySQL data.
ls -la /home/docker/mysql-data
This should show something like this:
drwxr-x--- 2  999  999     4096 Mar 25 01:16 '#innodb_temp'
drwxr-xr-x 6  999  999     4096 Mar 25 01:16  .
drwxr-xr-x 3 root root     4096 Mar 25 00:17  ..
-rw-r----- 1  999  999       56 Mar 25 00:17  auto.cnf
-rw-r----- 1  999  999  3090087 Mar 25 00:17  binlog.000001
-rw-r----- 1  999  999      155 Mar 25 00:21  binlog.000002
-rw-r----- 1  999  999      405 Mar 25 01:16  binlog.000003
-rw-r----- 1  999  999      155 Mar 25 01:16  binlog.000004
-rw-r----- 1  999  999       64 Mar 25 01:16  binlog.index
-rw------- 1  999  999     1680 Mar 25 00:17  ca-key.pem
-rw-r--r-- 1  999  999     1112 Mar 25 00:17  ca.pem
-rw-r--r-- 1  999  999     1112 Mar 25 00:17  client-cert.pem
-rw------- 1  999  999     1680 Mar 25 00:17  client-key.pem
-rw-r----- 1  999  999     4744 Mar 25 01:16  ib_buffer_pool
-rw-r----- 1  999  999 50331648 Mar 25 01:16  ib_logfile0
-rw-r----- 1  999  999 50331648 Mar 25 00:17  ib_logfile1
-rw-r----- 1  999  999 12582912 Mar 25 01:16  ibdata1
-rw-r----- 1  999  999 12582912 Mar 25 01:16  ibtmp1
drwxr-x--- 2  999  999     4096 Mar 25 00:17  mysql
-rw-r----- 1  999  999 31457280 Mar 25 01:16  mysql.ibd
drwxr-x--- 2  999  999     4096 Mar 25 00:17  performance_schema
-rw------- 1  999  999     1680 Mar 25 00:17  private_key.pem
-rw-r--r-- 1  999  999      452 Mar 25 00:17  public_key.pem
-rw-r--r-- 1  999  999     1112 Mar 25 00:17  server-cert.pem
-rw------- 1  999  999     1680 Mar 25 00:17  server-key.pem
drwxr-x--- 2  999  999     4096 Mar 25 00:17  sys
-rw-r----- 1  999  999 12582912 Mar 25 01:16  undo_001
-rw-r----- 1  999  999 10485760 Mar 25 01:16  undo_002
Making MySQL Remotely Accessible
By default, MySQL is only accesible via localhost for security reasons.
Let’s allow connection from remote machines to MySQL.
First, allow inbound to 3306.
ufw allow 3306/tcp
Then create a user that’s allowed to access MySQL from anywhere – this is just done by having % allocated as the user host.
Connect to MySQL.
mysql -h 0.0.0.0 -u root -p
Create the user with ALL PRIVILEGES.
CREATE USER 'root'@'%' IDENTIFIED BY 'YOUR_PASSWORD';
GRANT ALL PRIVILEGES ON *.* TO 'root'@'%' WITH GRANT OPTION;
NOTE ON SECURITY
Do this at your own risk – I’m being pragmatic with my setup – I like having root access to MySQL from my any location and do not have any sensitive information in there just yet.
App Docker File and Docker CI
We need to ensure we have a Dockerfile for our app that works. For My .NET Core MVC app, this looks pretty close to the default.
FROM microsoft/dotnet:2.2-aspnetcore-runtime AS base
WORKDIR /app
EXPOSE 80

FROM microsoft/dotnet:2.2-sdk AS build
WORKDIR /src
COPY . .
RUN dotnet restore "MyApp.Web.csproj"
RUN dotnet build "MyApp.Web.csproj" -c Release -o /app

FROM build AS publish
WORKDIR /src
RUN dotnet publish "MyApp.Web.csproj" -c Release -o /app

FROM base AS final
WORKDIR /app
COPY --from=publish /app .
ENTRYPOINT ["dotnet", "MyApp.Web.dll"]
The .gitlab-ci.yml under your repo’s root looks like this.
services:
   - docker:dind

stages:
    - build

before_script:
    - "cd MyApp.Web"

build:
    image: docker:stable
    stage: build
    script:
        - "docker login -u MY_USERNAME -p $REGISTRY_ACCESS_TOKEN registry.gitlab.com"
        - "docker build . -t registry.gitlab.com/andyw14/myapp"
        - "docker push registry.gitlab.com/andyw14/myapp:latest"
Deploying the App
For deploying the app itself, I just have a local sh file that I run.
ssh -l MY_USER -i /PATH_TO_PRIVATE_KEY SERVER_IP <<'ENDSSH'
docker login -u DOCKER_REGISTRY_USER --password-stdin DOCKER_REGISTRY_PASSWORD registry.gitlab.com
docker pull registry.gitlab.com/andyw14/myapp:latest
docker rm -f myapp || true
docker run --restart unless-stopped --name myapp -d -e ENVIRNMENT=production registry.gitlab.com/andyw14/myapp
ENDSSH
Why am I keeping this separate from the pipeline and ran manually? – well, I haven’t actually manage to get this to work under Gitlab CI yet. I might give it another shot another time, but for the time being, I’m fine with this 2-step deployment 🙂
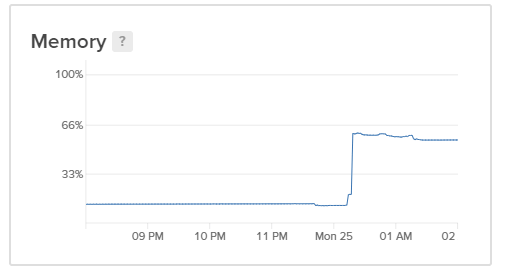
Why Not Kubernetes?
In one of my previous posts, I was wanting to use Kubernetes, but after playing around with k8s for a while, I quickly realised how much I didn’t know about Kubernetes and how much complexity it adds. Kubernetes is an orchestration tool – and for majority of hobby projects out there, it’s really not worth it – there are more downsides than upsides.
Aside from that, Kubernetes consumes a lot of precious memory that you actually want for the stuff you actually want to utilise anyway, and this adds further costs – and that’s completely against what I’m trying to do which is, have a reliable working solution, that’s simple, easy to deploy and rollback (3 steps or less), and cost as little £££ / performance as possible.
Next Steps
Reverse proxy
I really don’t want to run just a single app running in one server, I need a reverse proxy for setting up virtual hosts and forwarding requests to paths to different things which should give me lots of flexibility in how I want the routing setup. This also keeps the cost of hosting per app down quite significantly.
Logging
I need to start logging app logs to logz.io – they have a 3GB free daily logs with 3 day retention which is perfect for my purpose.
Security Hardening
Change port for ssh and MySQL.
Versioning
I still haven’t quite figured this out yet with Gitlab CI – the posts that I’ve seen around this look very involved – perhaps someone has pointers for a better / simpler solution?
How do you host and deploy your projects? Let me know, I’m interested what others do 🙂